English
 Translate
ROS2 Guide
Update history
| Date | Version | Author | Update content |
|---|---|---|---|
| 2026-11-04 | v0.1 | lxowalle | Initial release |
ROS2 connects sensors, robot bases, arms, and algorithms. Common uses include:
- Obstacle avoidance: Use depth or point clouds to detect obstacles and inform slowing, stopping, or planning around them.
- Navigation and inspection: Combine maps and localization to reach a destination or follow an inspection route.
- Mapping: Combine camera observations with robot motion to build a map.
- Robot arms: Use spatial information to assist object localization and collision-aware planning.
This page covers connecting the camera, viewing images and point clouds, saving data, and recording. Navigation, mapping, and arm applications require their own robot software configuration.
For first use, complete environment setup, camera connection, and the first-use steps in order. Afterward, daily use only requires loading the environment and starting the viewer.
Prepare the environment
Run these steps on the Ubuntu 22.04 computer connected to the camera, using ROS2 Humble. For other operating systems, follow the corresponding official ROS instructions.
This installs ROS2, build tools, and SDK dependencies. If Humble is already installed, skip repository setup but still install the listed dependencies.
Check the system version
cat /etc/os-release
dpkg --print-architecture
Confirm Ubuntu with VERSION_ID="22.04" and architecture amd64 or arm64. These are the Ubuntu package targets used here.
Check UTF-8 support
locale
A UTF-8 locale is sufficient, including non-English locales. Only configure one if UTF-8 is missing:
sudo apt update
sudo apt install locales
sudo locale-gen en_US en_US.UTF-8
sudo update-locale LC_ALL=en_US.UTF-8 LANG=en_US.UTF-8
export LANG=en_US.UTF-8
export LC_ALL=en_US.UTF-8
locale
Add the official ROS2 repository
The repository lets Ubuntu's package manager find ROS packages. Install the prerequisites:
sudo apt update
sudo apt install software-properties-common curl python3
sudo add-apt-repository universe
Then install the official repository configuration package:
# Find the latest official repository configuration release
D640_ROS_APT_VERSION="$(curl -fsSL https://api.github.com/repos/ros-infrastructure/ros-apt-source/releases/latest | python3 -c 'import json,sys; print(json.load(sys.stdin)["tag_name"])')"
# Download the package for Ubuntu 22.04
curl -fL --retry 3 -o /tmp/ros2-apt-source.deb "https://github.com/ros-infrastructure/ros-apt-source/releases/download/${D640_ROS_APT_VERSION}/ros2-apt-source_${D640_ROS_APT_VERSION}.jammy_all.deb"
# Install the repository configuration
sudo dpkg -i /tmp/ros2-apt-source.deb
If downloading fails, resolve it before continuing. Follow the official Humble installation guide if repository instructions change.
Install ROS2 and dependencies
# Refresh package lists
sudo apt update
# Install ROS2, RViz, and SDK build/runtime dependencies
sudo apt install ros-humble-desktop ros-dev-tools \
  build-essential cmake ninja-build pkg-config \
  libopencv-dev zlib1g-dev python3-colcon-common-extensions \
  python3-catkin-pkg python3-yaml python3-rosdep
Load and check ROS2
Check the current shell:
ps -p $$ -o comm=
Select Bash or Zsh to match the result, then run the command:
source /opt/ros/humble/setup.bashsource /opt/ros/humble/setup.zsh# Expect humble
echo "$ROS_DISTRO"
# Confirm that the ROS2 command is available
ros2 --help
If ros2 is not found, check for an error from the selected source command. Load the environment again in every new terminal, or set up automatic loading later.
Obtain the SDK and install its ROS dependencies
Download and extract the latest SDK source package. Confirm that it contains scripts/setup-ros2.sh and the ros2 folder. Then run the commands below from the SDK source directory.
# Enter the SDK root; adjust this path to your extracted folder
cd maixsense_d640_sdk
# Initialize once; skip if rosdep is already initialized
sudo rosdep init
# Update dependency information
rosdep update
# Install dependencies declared by the SDK's ROS package
rosdep install --from-paths ros2 --ignore-src -r -y --rosdistro humble
After this setup, viewing and recording do not require reinstalling dependencies.
Connect the camera
Connect it over USB. On Linux, configure access permissions.
First use
Build the camera tools
From the SDK root:
# Build and install to ~/.local/maixsense-d640-ros2 by default
./scripts/setup-ros2.sh
Build only on first installation or after updating the source, not each time you use the camera.
Load the camera environment
Run the matching command in each new terminal:
source "$HOME/.local/maixsense-d640-ros2/env.bash"source "$HOME/.local/maixsense-d640-ros2/env.zsh"Optionally add the command once to ~/.bashrc for Bash or ~/.zshrc for Zsh to load it automatically in new terminals.
Check readiness
# Check the environment and USB identity without starting capture
ros2 run maixsense_d640_driver maixsense_d640 doctor
View images and point clouds
On a computer with a graphical desktop:
# Start capture and a configured RViz viewer
ros2 run maixsense_d640_driver maixsense_d640 view
The first start may take some time. Wait for ready and confirm that images and the cloud keep updating. If it stays at waiting for camera, check USB and Linux access.
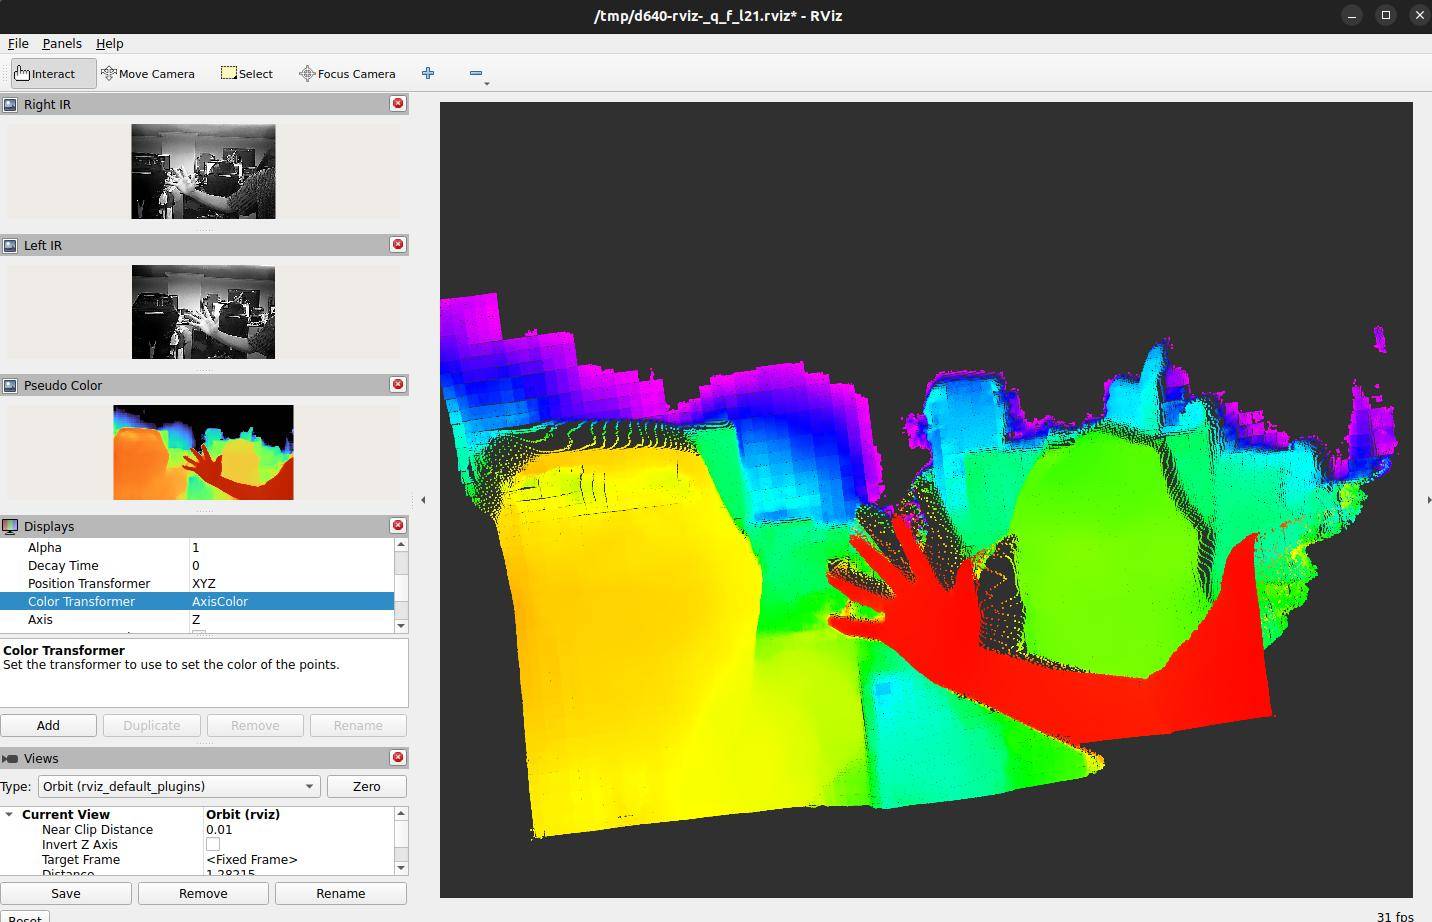
Pseudocolor represents distance rather than the object's real color. The cloud shows the object's 3D shape. With the pointer over the 3D area:
- Drag with the left button to rotate.
- Drag with the middle button to pan.
- Scroll to zoom.
The cloud is colored by forward depth. Its color range adjusts automatically, so a color is not a fixed distance label. If points are white, expand Depth PointCloud, set Color Transformer to AxisColor, choose Z for Axis, and disable Use Fixed Frame.
Press Ctrl+C in the launch terminal to stop. Run one capture program per camera. Stop it before switching modes.
Daily use
Choose what to view
Load the environment, then choose one command:
# Depth and point cloud
ros2 run maixsense_d640_driver maixsense_d640 view

# Left and right infrared only
ros2 run maixsense_d640_driver maixsense_d640 view --preset ir

# Device pseudocolor only; this mode does not output depth or a point cloud
ros2 run maixsense_d640_driver maixsense_d640 view --preset pseudo
Add a view in RViz
- Under Displays, click Add → By topic.
- Expand a topic, select the display type below, and click OK.
- Enable the display and confirm that data updates.
A topic is a named channel carrying data. Default names are:
| Content | Topic | Display type |
|---|---|---|
| Depth pseudocolor | /stereo/pseudo_color/image_raw |
Image |
| Raw depth | /stereo/depth/image_raw |
Image |
| Left infrared | /stereo/left/image_raw |
Image |
| Right infrared | /stereo/right/image_raw |
Image |
| Point cloud | /stereo/points2 |
PointCloud2 |
Choose a camera
msd-enumerate is an SDK query tool installed by the setup script. It is available after loading the environment. For multiple connected cameras:
# Find the complete value after serial= in the device listing
msd-enumerate
# Replace YOUR_SERIAL with that actual serial
ros2 run maixsense_d640_driver maixsense_d640 view --serial YOUR_SERIAL
Check running status
Keep capture running and use another terminal with the environment loaded:
ros2 run maixsense_d640_driver maixsense_d640 status
Check connection status and serial to identify the camera. A listed topic does not by itself prove that frames are arriving.
Save images and point clouds
Start the default view and confirm that images and the cloud update.
In another prepared terminal:
# Save on the computer running the camera driver
mkdir -p "$HOME/d640-captures"
ros2 param set /stereo/camera save_directory "$HOME/d640-captures"
# Save the most recently cached images and point cloud
ros2 run maixsense_d640_driver maixsense_d640 save --kind both
Check the returned paths and files. Default depth capture saves raw depth and enabled infrared images, not an RViz screenshot or the host-generated pseudocolor image.
Use --kind images for images only or --kind cloud for a cloud only.
Record data
Start view or start first and confirm that the camera is producing data. Recording stores ROS messages, not an MP4 video.
Keep capture running and use another prepared terminal:
# Use a new folder name for each recording
ros2 run maixsense_d640_driver maixsense_d640 record --output ./d640-bag
Press Ctrl+C in the recording terminal to finish recording. Capture continues.
Inspect the result:
# Check topics, duration, and message counts
ros2 bag info ./d640-bag
Confirm that the required topics have nonzero message counts.
Before replay, stop live capture to prevent live and recorded data from sharing the same topics. Then run:
ros2 bag play ./d640-bag
Replay does not open a viewer. Run rviz2 in another prepared terminal and add the recorded topics. The default point cloud Global Options → Fixed Frame is depth_optical_frame. If a display stays empty, set the topic's Reliability Policy to Best Effort. Do not run view during replay, because it starts the real camera again.
Capture without a viewer
For SSH or capture without a graphical window:
ros2 run maixsense_d640_driver maixsense_d640 start
Query, save, and record from another prepared terminal. Press Ctrl+C in the capture terminal to stop.
Next steps
- Write a processing program: SDK Guide and the SDK's
ros2/README.zh-CN.mdreference (Chinese). - Fix connection or access problems: Quick Start.