Burn Image
Update history
| Date | Version | Author | Update content |
|---|---|---|---|
| 2024-07-30 | v1.0 | zepan |
|
Get Images
Bianbu

LicheePi3A has been supported by the official bianbu image of Spacemit
You can go to the official mirror site of Spacemit https://archive.spacemit.com/image/k1/version/bianbu/ )Download, please note to download images v1.0.11 or higher
Debian 13 (trixie)

LicheePi3A image from Spacemit
Spacemit image: https://archive.spacemit.com/image/k1/version/debian/
Fedora

https://images.fedoravforce.com/LicheePi%203A
openKylin

https://www.openkylin.top/downloads/
Deepin

https://ci.deepin.com/repo/deepin/deepin-ports/cdimage/20240815/riscv64/
irradium

https://dl.irradium.org/irradium/images/lichee_pi_3a/
mirror 1, mirror 2, mirror 3
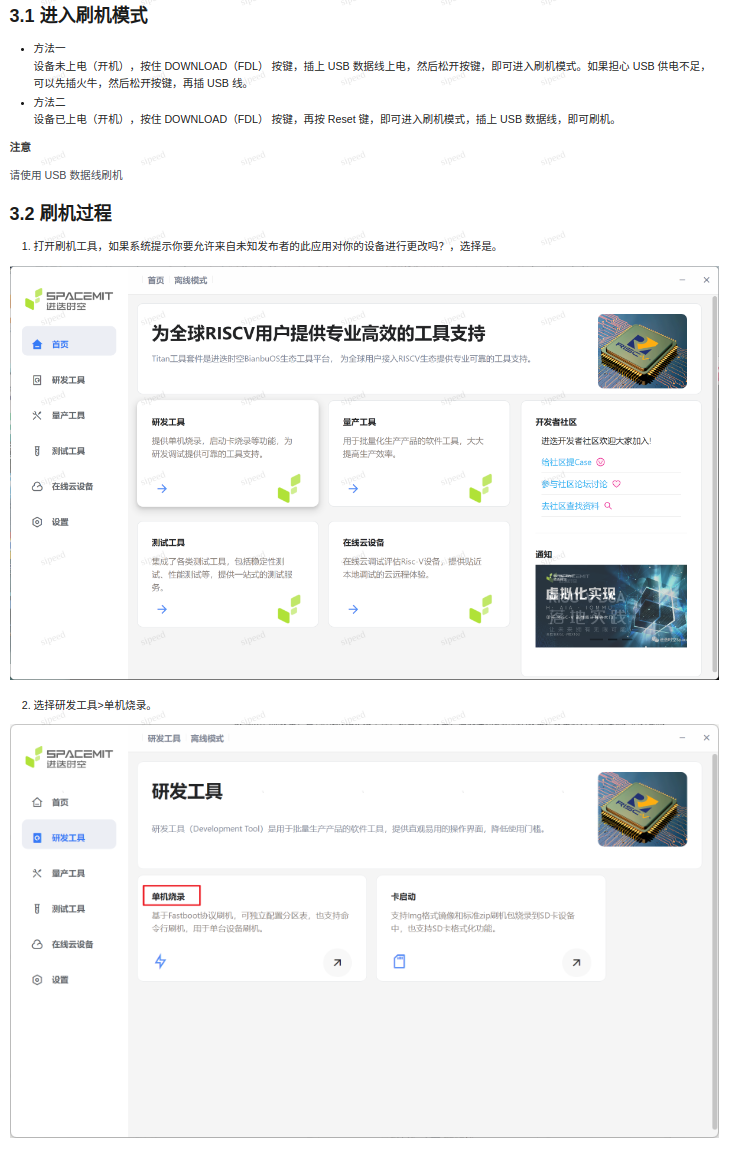
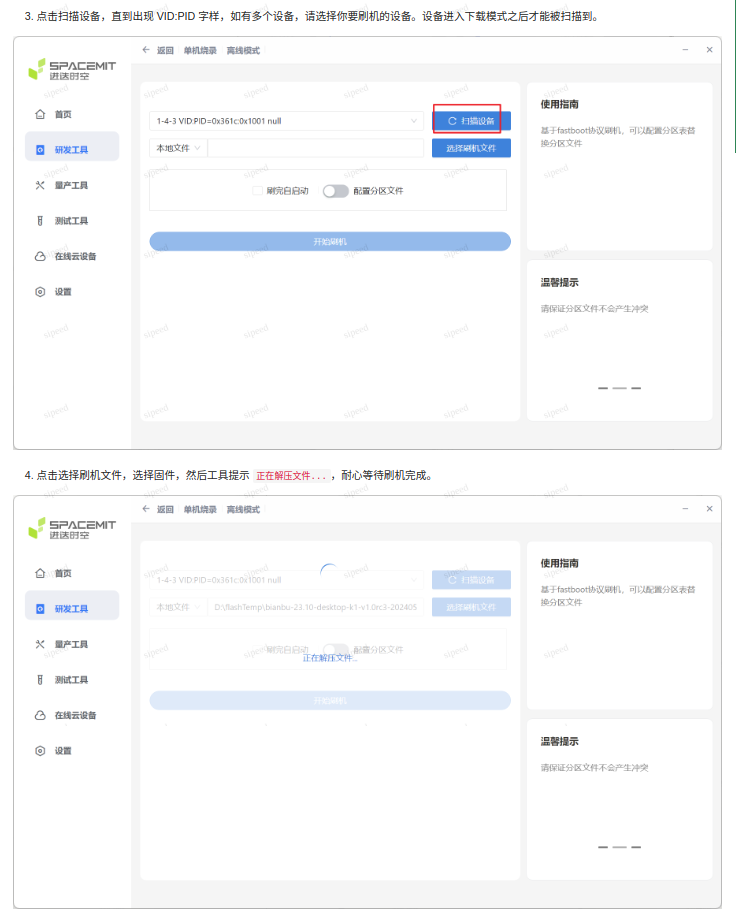
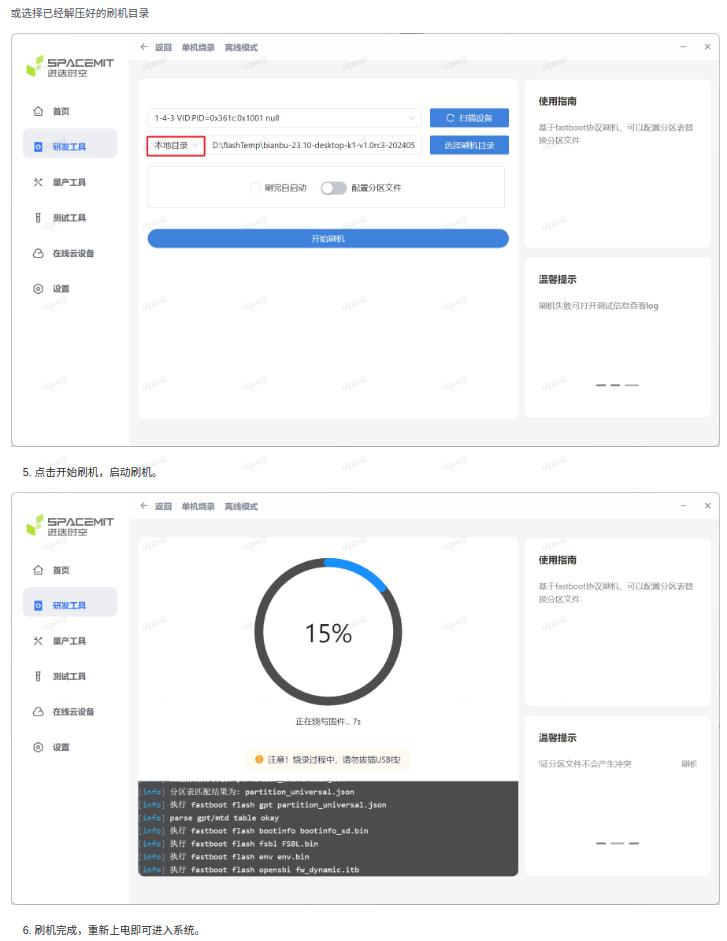
Get burning tools
LicheePi3A can be burned using fastboot or titan burning tools.
Windows
Linux
Download the latest tools from the official website of Spacemit:
https://developer.spacemit.com/#/Documentation
Burning Guide:
https://bianbu.spacemit.com/installation_and_upgrade
Burn eMMC
Use Titan Flasher to flash the device
When the board detects that the BOOT key is pressed during startup, it can enter the burning mode. That is to say, first press and hold the BOOT key, then plug it in or short press the RESET key to enter the burning mode.


Use Fastboot to flash the device
The zip firmware ending in. zip can be used to flash the device with fastboot after decompression.
Prerequisite
- The device has been plugged in with a USB data cable and connected to a PC;
- Install the fastboot command on the computer.
Flashing steps
- Unzip firmware
- Download the flashing script flash all. zip , and extract it to the firmware directory;
- Enter fastboot mode
reboot fastboot
Wait for the device to restart and enter fastboot mode:
- Run the flash all script and wait for the flashing to complete;
- When running flash all. sh on a Linux PC, be sure to grant executable permissions first; Run flash all. bat on Windows PC;
- After flashing the device, simply power it on again to enter the system.
Burn TF card
The firmware ending in img.zip is the sdcard firmware. After decompression, it can be written to the sdcard using the dd command or balenaEtcher. Please note that this firmware is not compatible with eMMC.
Steps
- Write the firmware to the sdcard;
- Insert the sdcard into the device;
- The device can be started by powering it on.
LPi4A compatibility settings
Note that if you are using the LPi4A motherboard, the differences in the motherboard may cause the USB A port under the default image to be unusable. For the first use, you need to connect to the serial port or network, enter the device terminal, and replace the dtb
Under/boot/spacemit/6.1.15/, overwrite k1-x_lpi3a_4a.dtb with k1-x_lpi3a.dtb and restart to use USB
LCD support
The default image only has HDMI output enabled. If LCD support is required, dtb needs to be replaced
Under/boot/spacemit/6.1.15/, overwrite k1-x_lpi3a_lcd.dtb with k1-x_lpi3a.dtb and restart to use the LCD
Please note that this dtb must be connected to an LCD in order to use it


 English
 Translate