English
F&Q
Updating to Solve Issues
NanoKVM Pro will periodically update applications, and some issues may have been resolved in newer versions. Therefore, please try updating the application first.
System Boot
Green LED Blinking
The green LED serves as the power indicator for NanoKVM Pro. If a power source with insufficient capacity is connected, the green LED may blink due to voltage instability and fail to start up. Please disconnect all power connections and replace the power adapter.
Malfunction After Switching to PiKVM
Some devices running application version 1.2.9 may experience repeated PiKVM reboots after switching to PiKVM mode. Please update the application version to 1.2.10 or higher via the NanoKVM Web interface to resolve this issue.
If you are unable to switch back to NanoKVM, please refer to Image Burning Methods to re-flash the NanoKVM-Pro image.
Network-related Issue
WiFi Version NanoKVM-Pro ATX/Desk Missing WiFi Configuration Interface
To resolve this issue, please update to version 1.2.13 or above via Settings -> Check for Updates.
If you are unable to update via the web interface due to network issues, you can try resolving it by re-flashing the firmware: First download the firmware image for version 1.0.13 or above, then follow the operation steps to complete the flashing process.
NanoKVM-Pro ATX Unable to Configure Network via OLED Screen
In earlier versions [1], on the Wi-Fi variant of the ATX, long-pressing the USR button may cause the OLED to remain stuck on the Starting screen and fail to enter the Wi-Fi configuration page.
Temporary Workarounds:
Connect the device via Ethernet, then log in to the Web interface and complete Wi-Fi configuration under
Settings→Device→Wi-Fi.Connect the NanoKVM-ATX HID interface to a computer. On Windows, run
ipconfigin the Command Prompt (useifconfigon Linux), and locate the newly added IPv4 address in the form of10.aaa.bbb.ccc(for example,10.223.155.100). Access the NanoKVM Web interface via10.aaa.bbb.1, then complete Wi-Fi configuration underSettings→Device→Wi-Fi.
After successfully connecting to the network, it is recommended to update the application to version >= 1.2.9 to permanently resolve this issue.
[1]: Affected versions: 1.1.8 ~ 1.2.8
Video Related Issues
NanoKVM-Pro Cannot Display BIOS and Login Screen
When the host has multiple displays, it generally prioritizes the built-in screen or DP interface screen for displaying BIOS and login interface by default. Please refer to your motherboard manual to adjust the display priority, or use the loop-out interface to connect your display.
DP Adapter Compatibility Issues
DP adapters come in two types: passive and active. Passive DP adapters are low-cost but may pose compatibility risks, manifesting as resolution lists not matching EDID, host wake-up failing to activate the screen, etc. Using the reset HDMI function can wake up the screen.
Missing Resolution List, Inconsistent with Configured EDID
The resolution list in the host display settings is determined by the host, EDID, (potentially existing) loop-out screen, and video adapter collectively. You can switch between different EDIDs on the web page to achieve the most reasonable compatibility.
Note: In the hardware design of NanoKVM-Pro, HDMI first passes through a splitter chip before entering the HDMI capture chip. Due to chip limitations, writing is only possible to the capture chip. When a loop-out display is connected, the splitter chip automatically combines two EDIDs (the EDID of the capture chip and the EDID of the loop-out display). This process cannot be controlled by the main control chip, which is why the actual EDID used may differ from the configured EDID.
HDMI Icon Lit on NanoKVM Screen but No Video Displayed in Web Interface
NanoKVM-Pro supports video capture and loop-out functions. When only capturing video, it reports a maximum resolution of 4K30FPS to the host by default. When a loop-out display is connected, it reports a common resolution list.
For the default resolution and frame rate list, please refer to here.
When connected through video adapters or docking stations, the reported capabilities may change (e.g., reporting 4K60FPS capture support, which may cause capture failure). In such cases, adjust the display settings in the host system:
- On Windows: Go to
Settings→Display→Advanced Display Settings→ SelectNanoKVM-Prodisplay →Display Adapter Properties→List All Modes→ Choose the desired mode → Click Apply or OK.
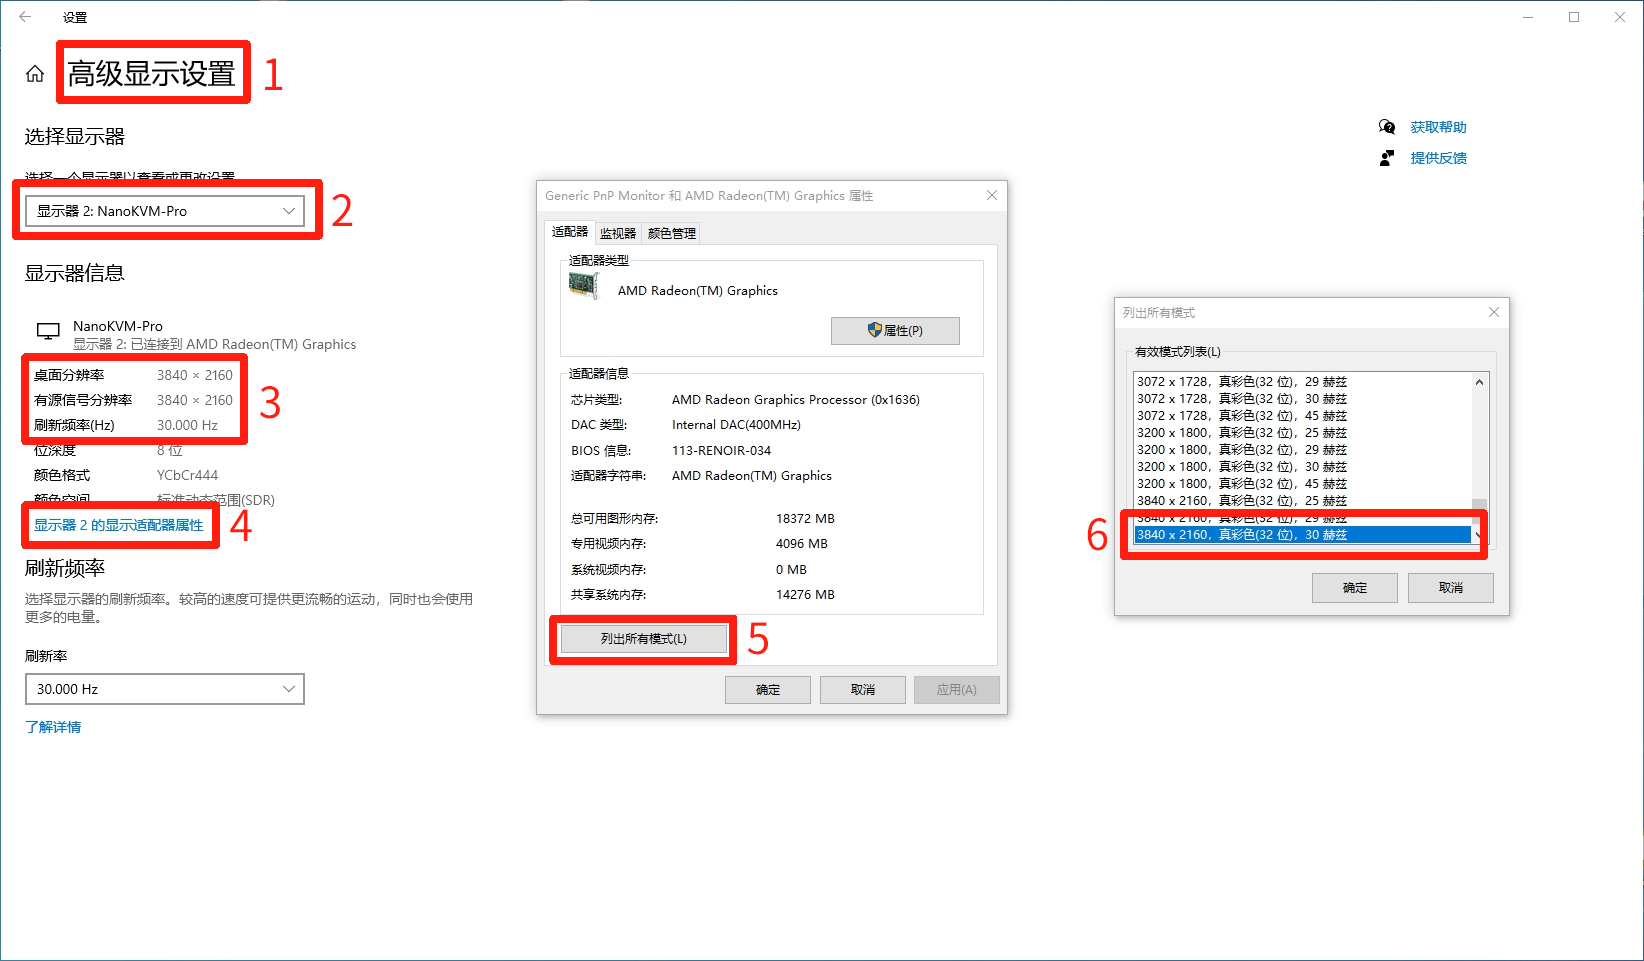
Blurry Image, Not Matching the Captured Resolution
- In the image above, box ③: If the desktop resolution is lower than the active signal resolution, the captured image may appear blurrier than expected. Follow the steps above to output a clear image.
Image Burning Methods
USB Burning (eMMC Version)
NanoKVM Pro supports restoring or updating the system via USB image burning.
Preparation
- Prepare a USB data cable
- Download the latest NanoKVM Pro image file
- Prepare a burning tool (such as balenaEtcher, Rufus, or the dd command)
Burning Steps
Download the Image and Burning Tool
- Visit the NanoKVM Pro Release Page to download the latest image file.
- Download and install the burning tool balenaEtcher.
Enter Burning Mode
- Please remove the TF card if installed.
- Use the USB data cable to connect the NanoKVM Pro's HID interface to your computer.
- Press and hold the User button on the NanoKVM, then power it on (or press the Reset button while powered on) until the orange LED turns off.
- The device will then enter burning mode, and the orange LED will start flashing again. Check if your computer recognizes the new disk device.

Windows Recognizing Device
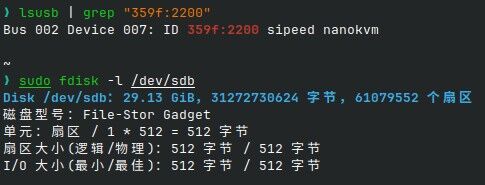
Linux Recognizing Device
- Burn Using balenaEtcher (Recommended)
- Launch balenaEtcher.
- Click "Flash from file" and select the downloaded image file.
- Click "Select target" and choose the recognized NanoKVM Pro device.
- Click "Flash!" to start the burning process.
- Wait for the burning to complete and verify.
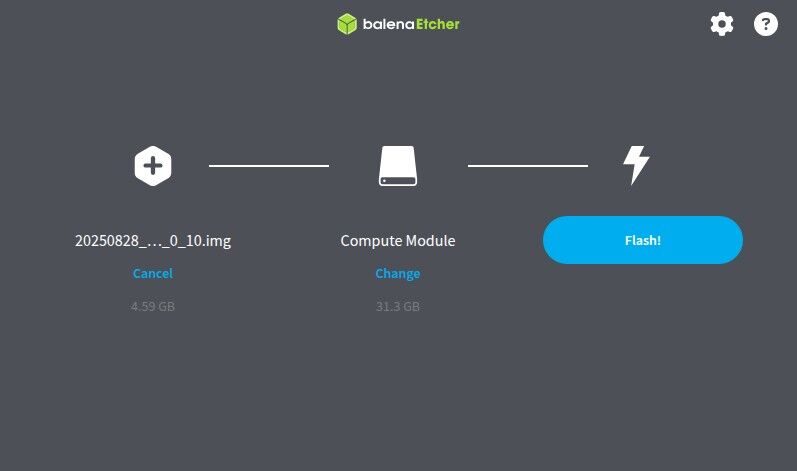
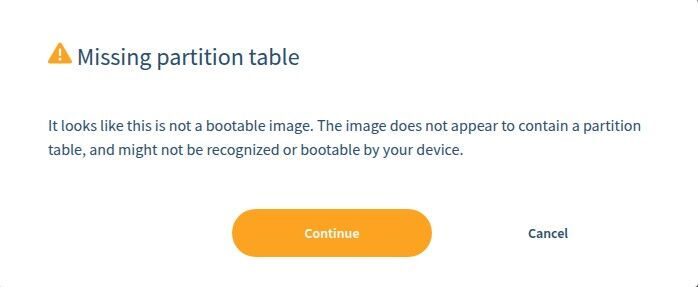
- If prompted that the partition table cannot be found, it is normal; click continue.
- Burn Using Command Line
# Find the device name
sudo fdisk -l

# Decompress the image file (if it is in .xz format)
xz -dv 20250828_NanoKVMPro_1_0_10.img.xz

# Burn the image (replace /dev/sdX with the actual device name)
sudo dd if=20250828_NanoKVMPro_1_0_10.img of=/dev/sdX bs=4M status=progress

sudo sync
- Restart the Device
- After burning is complete, safely eject the device.
- Disconnect the USB connection.
- Reconnect the power, and the device will automatically start the new system.
Notes
- Ensure you select the correct device to avoid accidentally operating on other storage devices.
- Do not disconnect the power or remove USB connections during the burning process.
- The first startup may take a long time for initialization and configuration.
- If the orange light does not turn on or the disk device does not appear, please refer to the methods below to use AXDL for burning.
AXDL Burning (eMMC Version)
AXDL is an official burning tool provided by Aixin, designed for burning AXP format system images. It currently supports Windows platform only.
Preparation
- Prepare a USB data cable.
- Visit the NanoKVM Pro Release Page to download the latest AXP format image file.
- Download and install the AXDL tool and corresponding drivers Download Link.
Burning Steps
Connect the Device
- Use the USB data cable to connect the NanoKVM Pro's HID interface to your computer.
Configure the Burning Tool
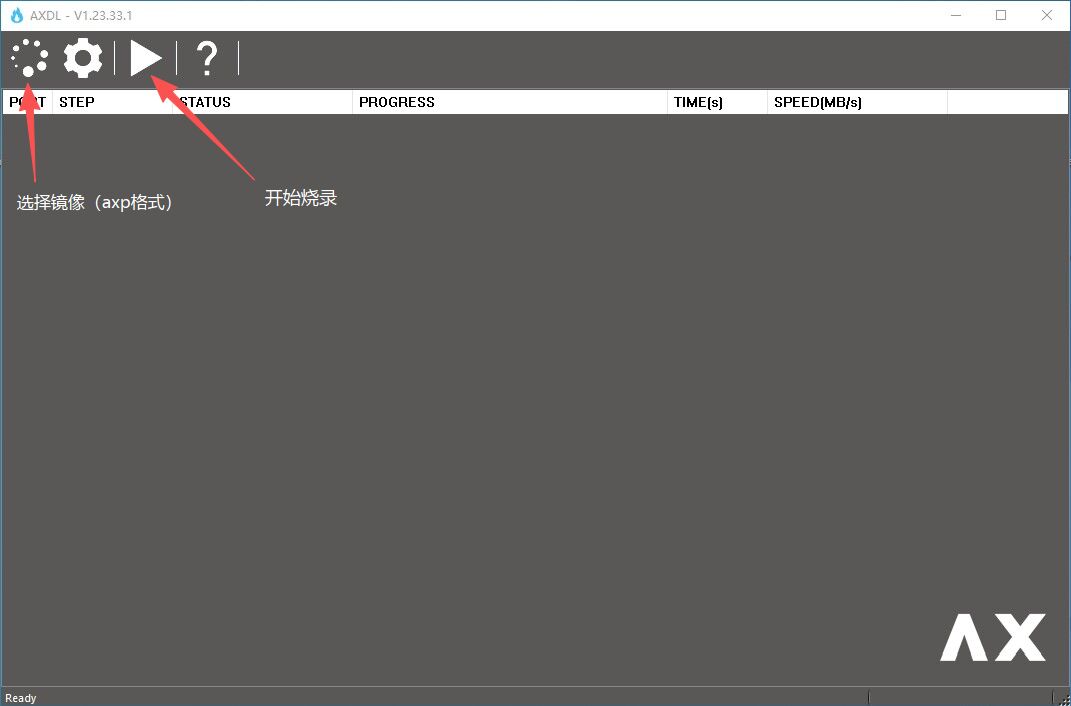
- Open the AXDL tool.
- Select the downloaded AXP format image file.
- Click the start burning button.
Enter Burning Mode and Start Burning
- Press and hold the User button on the NanoKVM, then power it on (or press the Reset button while powered on).
- The burning process will start automatically, wait for the progress bar to complete.
- Wait until the prompt indicates that burning was successful; the entire process is complete.
SD Card Flashing (eMMC or SD Card Version)
The NanoKVM Pro Desk currently supports booting the system from an SD card. Users can boot the system by flashing an SD card. This applies to both the eMMC and SD card versions of NanoKVM Pro.
Preparation
- Prepare an SD card with at least 16 GB capacity.
- Download the latest NanoKVM Pro SD image.
- Prepare a flashing tool such as
balenaEtcher,Rufus, or use the command-linedd. - Prepare a USB card reader to connect the SD card.
Flashing Steps
- Use
balenaEtcherorddto write the image to the SD card (see the "USB Burning" section above for details on writing images). - Insert the flashed SD card into the NanoKVM Pro's SD card slot.
- Disconnect power from the NanoKVM Pro Desk.
- Press and hold the NanoKVM Pro Desk
Userbutton while connecting power, then immediately release theUserbutton. The device will boot from the SD card. - To flash the eMMC after booting from the SD card, copy the eMMC image into the system, then use the
ddcommand to write the image to/dev/mmcblk0.
Desk Version LCD Not Lighting Up
This may be caused by a loose FPC cable connection of the LCD during transportation.
Click here to view the issue and repair details.
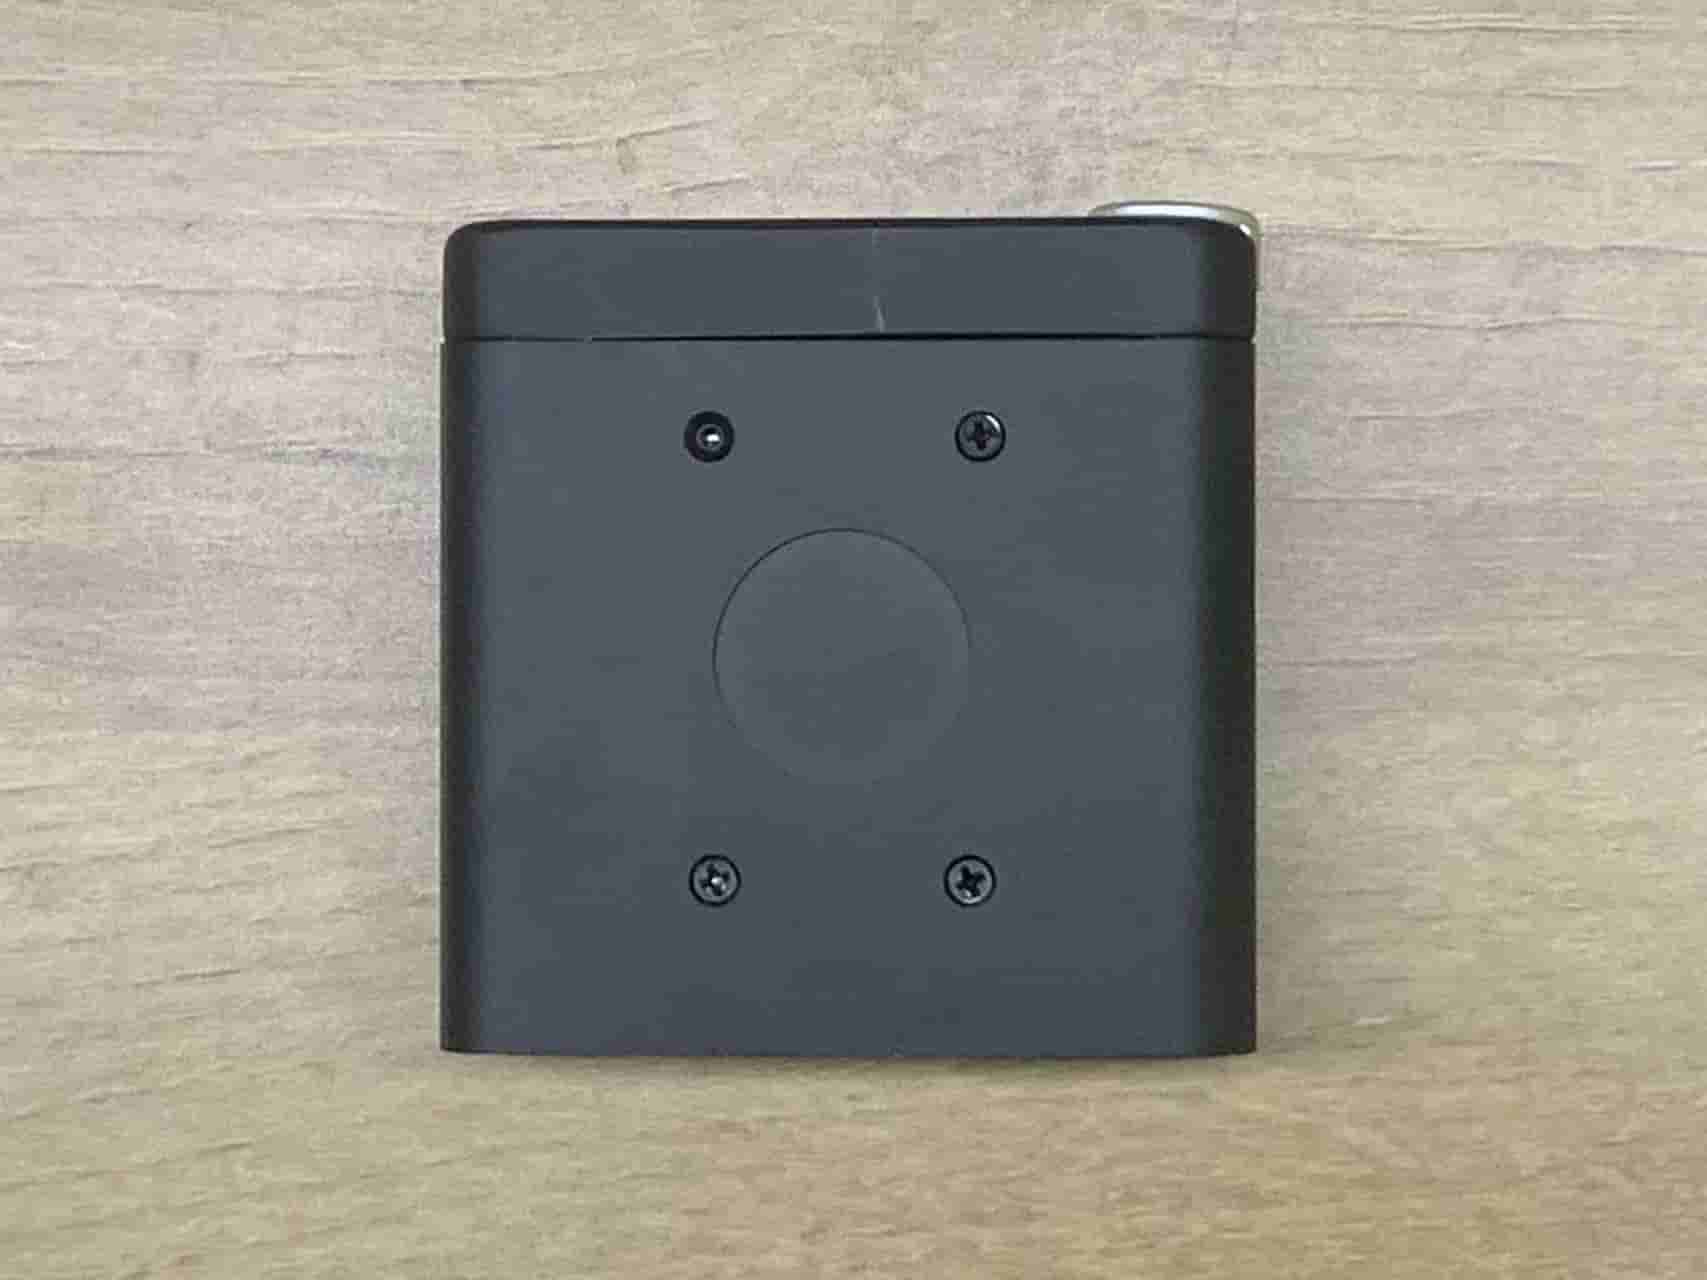
Appearance Issues
"Missing" Bottom Screw
In the first batch of NanoKVM-Desk units, the screw in the top-left position (shown below) was found to affect WiFi connection stability due to structural design considerations. This screw hole is intentionally left empty in later assemblies.