

 English
NanoKVM Desk Screen & Knob
Update history
| Date | Version | Author | Update content |
|---|---|---|---|
| 2025-10-18 | v0.2 | bugu |
|
| 2025-10-10 | v0.1 | zepan |
|
Introduction
The NanoKVM-Pro Desk is equipped with a 1.47-inch 320x172 mini display. In addition to serving as a basic configuration interface, it can also display user-customized content in various ways, functioning as a secondary screen.
HDMI Secondary Screen
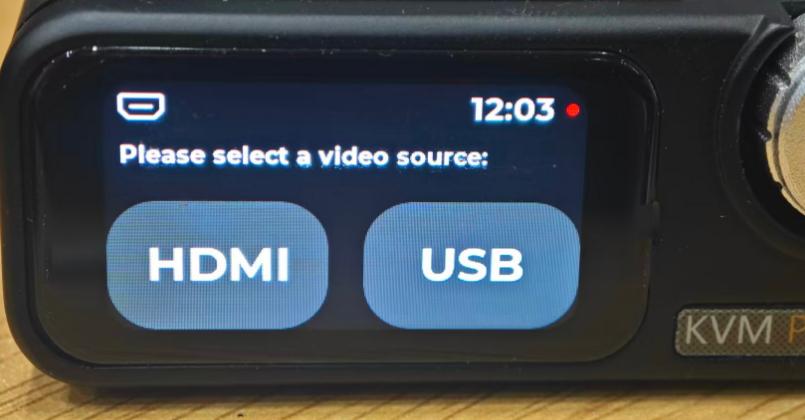
When NanoKVM-Pro is operating, it virtually emulates a monitor, allowing it to capture HDMI images and display them on its own screen, enabling HDMI secondary screen functionality.
In the UI, select the HDMI output video source to display the captured video image on the small screen.
When used as a desktop accessory, this feature can serve as a desktop mini secondary screen for performance monitoring, video thumbnail player, and other functions.
USB Secondary Screen
Currently, the USB secondary screen feature only supports Windows systems.
Download and extract the USB secondary screen driver: https://github.com/sipeed/NanoKVM-Pro/releases/download/v1.0.5/nanokvmpro_usb_graphic_win.zip
On the Desk: From the screen, tap
Settings→USBto enter the USB configuration page, then enablePanel.On the controlled machine:
- Open
Device Manager→Other devices - Find
NanoKVMPro→ Right-clickProperties→Driver→Update Driver - Select
Browse my computer for drivers→Let me pick from a list of available drivers on my computer - Double-click
Show all devices - Find
USB Composite DeviceunderStandard USB Host Controller/标准 USB 主机控制器/Standard system devices/标准系统设备→ Double-click to install
Note: Driver locations may vary across different Windows versions. Please search patiently.
- Open
After completion, a new
loop input to outputdevice will appear underOther devicesinDevice Manager.Right-click the device →
Update Driver→Browse my computer for drivers→Browse→ Select the USB secondary screen driver folder →Next→ Follow the prompts to complete installation.If you encounter errors like "Windows found drivers for your device but encountered an error while attempting to install them" during driver installation, you can use the following methods to resolve this:
Method 1: Temporarily Disable Driver Signature Enforcement
- Hold down the
Shiftkey, clickStart Menu→Restart - After entering Advanced Startup Options, select
Troubleshoot→Advanced options→Startup Settings→Restart - After restart, press
F7or7to selectDisable driver signature enforcement - Reinstall the driver after the system starts
- Note that this method may not work on newer Windows 11 versions
Method 2: Enable Test Mode (Requires Secure Boot to be Disabled)
- Enter the BIOS setup and disable Secure Boot following your motherboard's instructions
- Open
Command PromptorPowerShellas Administrator - Execute the command:
bcdedit /set testsigning on - Restart your computer, then you can install unsigned drivers
- To disable test mode, execute:
bcdedit /set testsigning offand restart
Note: In test mode, a "Test Mode" watermark will appear in the bottom-right corner of the desktop. This is normal behavior.
- Hold down the
After driver installation is complete, a new NanoKVM graphics device will appear in the
Display adapterssection.On the Desk, navigate to the secondary screen page from the screen and select USB to use the Desk as a USB secondary screen.
To disable, refer to step 2 and turn off
Panel.When re-enabling, some systems may require reinstalling the USB driver.
Custom Display
Note: This feature requires the NanoKVM-Desk application to be updated to version
1.1.5or higher.
NanoKVM Desk introduces a user-defined APP function in version 1.1.5. By long-pressing the screen/knob and switching to the fourth page, you can view all APPs. Three demo apps are pre-installed by default: coin, conway, and hello.
How to Build Your Own Application
NanoKVM Desk will search for all folders in the system's /userapp directory and use the folder names as APP names. It is recommended to keep folder names under 8 characters.
In the User APP interface, when you click on a user-defined application, the system will attempt to launch a Python application named main.py inside the corresponding folder.
At this point, the small screen uses the standard FB driver, allowing users to utilize /dev/fb0 to implement custom screen display operations.
Clicking the screen or pressing the knob will exit the application.
