

 English
Upload scripts & modules to the development board
Earlier we came into contact with the direct execution of pye("filename.py") command to open an editor, which can directly edit files in the file system
But slowly we will find that this method is only suitable for changing a small amount of code. When the amount of code is huge or we need highlighting support, it is not applicable. We need to write the code on the computer and upload it to the board. Inside the file system
There are currently the following methods:
Use MaixPy IDE to upload scripts to the development board
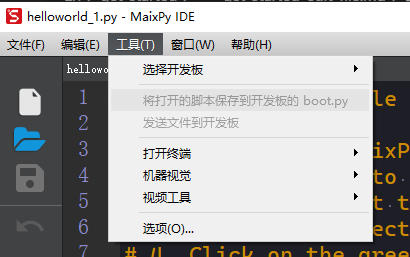
Open MaixPy IDE, connect to the development board
Edit the file, and then in the top Tool (tool) menu, click Save the opened file as boot.py to save the code to the boot.py file of the development board. Next time the development board is powered on This file will be executed automatically
Of course, you can also use the send file function in the top Tool menu to send a file. It will be saved to the development board and the file name is the same as the file name on the computer. )
Use the graphical tool uPyLoader to upload and run scripts
uPyLoader is an open source software, with which you can easily connect to MaixPy and upload, download, execute files, and monitor output at the same time. The functions are relatively complete
Download the executable file: release
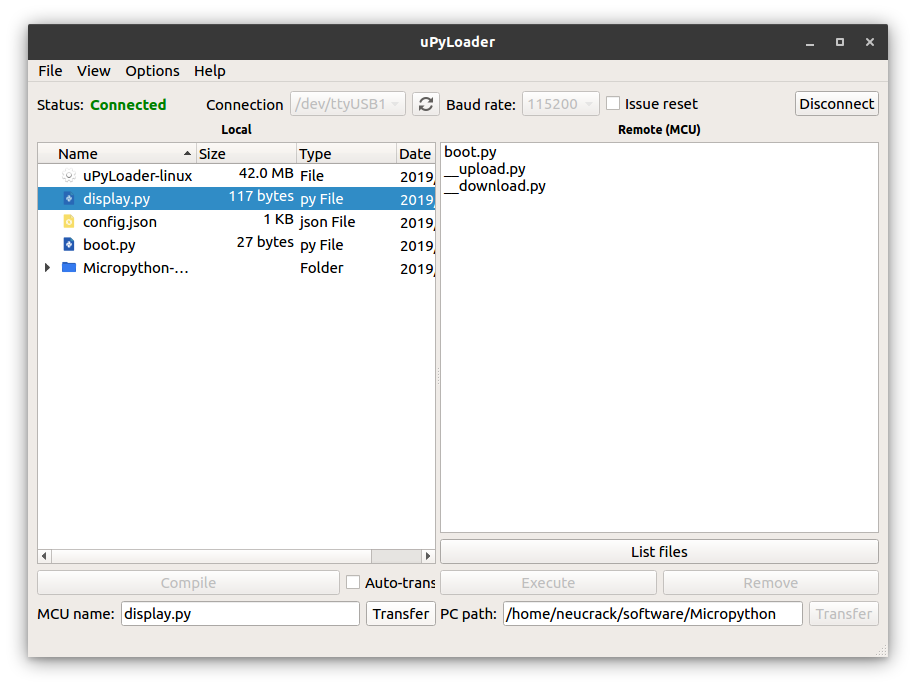
Select the serial port and click the Connect button to connect to the board
The software needs to be initialized the first time to run the software. Click File->Init transfer files to complete the initialization. This will create two files on the board, namely __upload.py and __download.py.
Select the file to be uploaded on the left and click Transfer to upload to the file system of the board.
On the right is the file in the board, click on List files to refresh the file list, select the file name, click on Execute to execute the script file
Click on the above View -> terminal to open the terminal to view the runtime output or send commands
Use tool rshell
Just like using the linux terminal, use the cp command of rshell to simply copy files to the development board
Install rshell according to the instructions of rshell project homepage
sudo apt-get install python3-pip
sudo pip3 install rshell
rshell -p /dev/ttyUSB1 # Here, choose the serial port according to the actual situation
ls /flash
cp ./test.py /flash/ #Copy the file test.py in the current directory of the computer to the flash root directory of the development board
Of course, there are more functions, please visit its Project Homepage
Use the command line tool ampy
ampy is a simple and easy-to-use command line tool to upload, download and execute files, and it is open source
Note that this tool is running on the computer, not on the board
Use ampy --help to view help information
Use the ampy run file_in_PC.py command to run the script directly on the board instead of uploading the script to the board
SD(TF) Direct operation
After copying to the SD card, execute import filename or exec() in the terminal to run the script
SD card is automatically copied to Flash file system
In order to copy the contents of the SD card to the Flash file system conveniently, only need to rename the file to be copied to the Flash file system to cover.boot.py or cover.main.py, and then put it in the root of the SD card Directory, the development board is powered off and inserted into the SD card, and then the development board is powered on, the program will automatically copy these two files to /flash/boot.py or /flash/main.py, so that even later Take out the SD card, the program is already in /flash/boot.py or /flash/main.py
