English
MaixCAM2 MaixPy Quick Start
From Power-On to Your First Program
MaixCAM2 is available in versions with and without eMMC storage. The 32GB eMMC version normally boots from eMMC and does not require a TF card for daily use; the version without eMMC must use a TF card with a flashed system to boot. A TF card can also be used to boot from TF card, or to flash or recover the system to eMMC. For system upgrade or flashing, see System Upgrade and Flashing.
Getting Started Video
Power On
Power MaixCAM2 with a Type-C cable. Wait for it to start and show the function-selection screen.
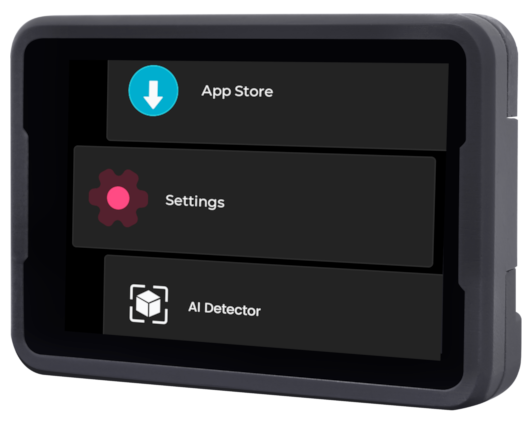
If the screen does not display:
- Please confirm that you purchased the bundled TF card. If you confirm that you have a TF card and it is inserted into the device, you can try updating to the latest system.
- If you did not purchase the TF card bundle, you need to follow the instructions in updating to the latest system to flash the latest system onto the TF card.
- Also, ensure that the screen and camera cables are not loose. The screen cable can easily come off when opening the case, so be careful.
Connect to the Network
The first setup needs internet access to activate the device, install the runtime, and connect development tools. You can use a phone hotspot if no router is available.
Click Settings on the device and select WiFi. There are two ways to connect to the WiFi hotspot:
- Scan the WiFi sharing code:
- Use your phone to share the
WiFihotspot QR code, or go to maixhub.com/wifi to generate a QR code. - Click the
Scan QR codebutton, the camera screen will appear, scan the QR code generated previously to connect.
- Use your phone to share the
- Search for hotspots:
- Click the
Scanbutton to start scanning the surroundingWiFi, you can click multiple times to refresh the list. - Find your WiFi hotspot.
- Enter the password and click the
Connectbutton to connect.
- Click the
Then wait for the IP address to be obtained, which may take 10 to 30 seconds. If the interface does not refresh, you can exit the WiFi function and re-enter to view it, or you can also see the IP information in Settings -> Device Information.
Install the Latest Runtime
The runtime provides basic features required by apps. Without the latest version, an app may fail to open or may close unexpectedly.
- Make sure the device is connected to WiFi, has an IP address, and can access the internet.
- On the device, click
Settings, and selectInstall Runtime Libraries. - After the installation is complete, you will see that it has been updated to the latest version. Then exit.
If Request failed appears, check whether the device can access the internet. If the network works but installation still fails, take a photo of the error and contact support.
Use Built-in Applications
The device includes apps such as Find Blobs, AI Detector, and Line Follower. The following video shows self-learning detection:
Open other apps from the function-selection screen. Their descriptions and updates are available in the MaixHub App Store.
Note: The applications only include a part of the functionality that MaixPy can achieve. Using MaixPy, you can create even more features.
Logging into the Terminal
If you need to log into the terminal, the default username for MaixCAM2 is root, and the password is sipeed.
Use as a Serial Module
This section is optional. Read it only when you need to send detection results over UART to another controller such as Arduino or STM32.
The built-in applications can be used directly as serial modules, such as Find Blobs, Find Faces, Find QR Codes, etc.
Note that the serial port can only directly connect to other microcontrollers. If you want to communicate with a computer via a serial port, you must provide a USB-to-serial module yourself.
Usage:
- Hardware connection: Open the MaixCAM2 pin diagram, choose an available UART, and connect its TX, RX, and GND pins to your controller. Normally, TX connects to the other device's RX, RX connects to TX, and both devices share GND. Avoid UART0 if you need communication immediately after startup because it is commonly used for system logs.
- Open the application you want to use, such as QR code recognition. When the device scans a QR code, it will send the result to your main controller via serial.
The serial baud rate is
115200, the data format is8N1, and the protocol follows the Maix Serial Communication Protocol Standard. You can find the corresponding application introduction on the MaixHub APP to view the protocol.
If an app does not send its result over UART, start from the matching MaixPy example and add output by following the UART guide.
Preparing to Connect Computer and Device
MaixVision connects to the device over a network. Choose either WiFi or USB; you only need one of them:
Method 1 (Highly Recommended): Wireless Connection. Connect the device to the same router or Wi-Fi hotspot that the computer is connected to via Wi-Fi. Go to the device's
Settings -> WiFi Settingsand connect to your Wi-Fi. (If you experience screen lag or high latency with Wi-Fi, you can try Method 2 for a wired connection.)Method 2: Wired Connection. The device connects to the computer via a USB cable and appears as a USB network adapter. Wired transfer is stable, but a faulty cable, loose connection, or missing driver can prevent detection. See the FAQ if that happens.
Method Two: Driver Installation on Different Computer Systems:
By default, there are two types of USB virtual network adapter drivers (NCM and RNDIS drivers) to meet the needs of different systems. You can also disable the unused virtual network adapter on the device under Settings -> USB Settings:
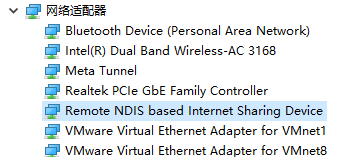
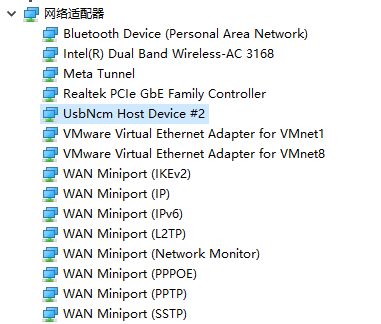
- Windows: All Windows systems will automatically install the RNDIS driver, while only Windows 11 will automatically install the NCM driver. As long as one of the drivers works, it is sufficient. If the RNDIS driver is not installed automatically, see the RNDIS driver installation guide.
- Open Task Manager -> Performance, and you should see a virtual Ethernet with an IP address such as
10.131.167.100, which is the computer's IP address. The device's IP address is the same but with the last digit changed to1, i.e.,10.131.167.1. If you are using Windows 11, you will see two virtual network adapters; you can use either IP address. - Additionally, you can open
Device Manager(search forDevice Managerin the search bar). The RNDIS and NCM drivers should be correctly installed, as shown below:
- Open Task Manager -> Performance, and you should see a virtual Ethernet with an IP address such as
- Linux: No additional setup is required. Simply plug in the USB cable. Use
ifconfigorip addrto see theusb0andusb1network interfaces, and either IP address can be used. Note: The IP address you see, such as10.131.167.100, is the computer's IP address, and the device's IP address is the same but with the last digit changed to1, i.e.,10.131.167.1. - MacOS: Check for the
usbnetwork adapter underSystem Settings->Network. Note: The IP address you see, such as10.131.167.100, is the computer's IP address, and the device's IP address is the same but with the last digit changed to1, i.e.,10.131.167.1.
Preparing the Development Environment
- Make sure the computer and device are connected through WiFi or USB.
- Download and install MaixVision.
- Open MaixVision and click
Connectin the lower-left corner. When the device appears, click its connect button.
If no device is detected, you can also manually enter the device's IP address in the device's Settings -> Device Info. You can also find solutions in the FAQ.
After a successful connection, the function selection interface on the device will disappear, and the screen will turn black, releasing all hardware resources. If there is still an image displayed, you can disconnect and reconnect.
Here is a video example of using MaixVision:
Run Examples
Click Example Code on the left side of MaixVision, select an example, and click the Run button in the bottom left to send the code to the device for execution.
For example:
hello_maix.py: Click theRunbutton, and you will see messages printed from the device in the MaixVision terminal, as well as an image in the upper right corner.camera_display.py: This example will open the camera and display the camera view on the screen.
from maix import camera, display, app

disp = display.Display()          # Construct a display object and initialize the screen
cam = camera.Camera(640, 480)     # Construct a camera object, manually set the resolution to 640x480, and initialize the camera
while not app.need_exit():        # Keep looping until the program exits (you can exit by pressing the function key on the device or clicking the stop button in MaixVision)
    img = cam.read()              # Read the camera view and save it to the variable img, you can print(img) to print the details of img
    disp.show(img)                # Display img on the screen
yolov5.pywill detect objects in the camera view, draw bounding boxes around them, and display them on the screen. It supports detection of 80 object types. For more details, please see YOLOv5 Object Detection.
After these examples work, choose other examples that match what you want to build.
If you encounter image display stuttering when using the camera examples, it may be due to poor network connectivity, or the quality of the USB cable or the host's USB being too poor. You can try changing the connection method or replacing the cable, host USB port, or computer.
Install Applications on the Device
The above examples run code on the device, but the code will stop running when MaixVision is disconnected. If you want the code to appear in the boot menu, you can package it as an application and install it on the device.
Click the Install App button in the bottom left corner of MaixVision, fill in the application information, and the application will be installed on the device. Then you will be able to see the application on the device.
You can also choose to package the application and share your application to the MaixHub App Store.
The default examples do not explicitly write an exit function, so you can exit the application by pressing the function key on the device. (For MaixCAM, it is the user key.)
If you want the program to start automatically on boot, you can set it in Settings -> Boot Startup.
More MaixVision usage refer to MaixVision documentation。