English
MaixCAM MaixPy Screenless Edition Quick Start
About This Document
As mentioned in the Quick Start Guide, it is strongly recommended to purchase the version with a screen for development, as it provides a better development experience, including using the built-in APP, accessing apps from the MaixHub App Store, and easier debugging (e.g., common settings can be completed directly by touching the screen interface, and images can be viewed in real-time).
However, if you are unable to purchase the version with a screen or require a screenless version for mass production, please refer to this document.
Getting a MaixCAM Device
- MaixCAM: Purchase it from the Sipeed Taobao Store or the Sipeed Aliexpress Store. You can find more information about MaixCAM here.
Initial Setup
Preparing the TF Image Card and Inserting it into the Device
If your package includes a TF card, it already contains the factory image. If the TF card was not installed in the device during manufacturing, carefully open the case (be careful not to disconnect any cables inside) and insert the TF card. Additionally, since the factory firmware may be outdated, it is essential to update the system to the latest version by following the updating to the latest system instructions; otherwise, some applications and APIs may not function properly.
If you did not purchase a TF card, you will need to flash the system onto your own TF card. Follow the updating to the latest system guide, then install the card into the board.
Powering On
Use a Type-C data cable to connect the MaixCAM device to provide power and wait for the device to boot.
Firstly: Ensure that the USB cable is of good quality and that the USB port on your computer is reliable (power supply >= 5V 500mA, normal interference resistance). The first boot may take about 20 seconds, after which your computer will detect one or two virtual network adapters (visible in your computer's network manager).
If the virtual network adapter is not detected:
- Ensure that you purchased the TF card package. If you have confirmed that the TF card is inserted into the device, try updating to the latest system.
- If you did not purchase the TF card package, you need to flash the latest system onto the TF card following the Upgrade and Flash System guide.
- Check if the USB connection is loose and whether the USB cable is of good quality; you can try using a better-quality cable.
- Ensure that the USB port provides sufficient power. You can try another USB port or even another computer if possible.
Logging into the Terminal
If you need to log into the terminal, the default username for MaixCAM is root, and the password is root.
Preparing to Connect the Computer and Device
To enable communication between your computer (PC) and the device (MaixCAM), they need to be on the same local area network. Two methods are provided; we will first use Method 1:
- Method 1: Wired connection. The device connects to the computer via a USB cable, and it will be recognized as a virtual USB network adapter, placing it on the same local area network as the computer. If you encounter issues, refer to the FAQ for common problems.
Method 2 involves driver installation on different computer systems:
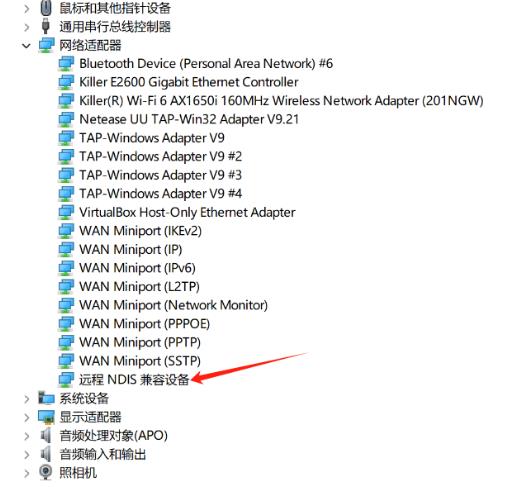
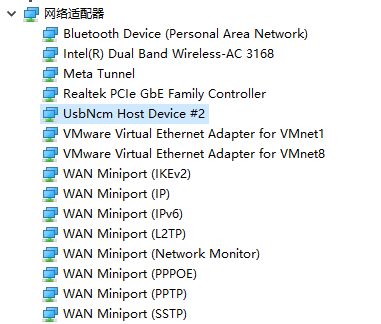
There are two default USB virtual network adapter drivers (NCM and RNDIS) to meet the needs of different systems:
- Windows: All Windows systems will automatically install the RNDIS driver. Only Win11 will automatically install the NCM driver. Either one that works is fine (NCM is faster than RNDIS). If the RNDIS driver is not installed automatically, see the RNDIS driver installation guide.
- Open Task Manager -> Performance, and you will see a virtual Ethernet connection with an IP, for example,
10.131.167.100is the computer's IP, and the device's IP is the same except the last digit changed to1, i.e.,10.131.167.1. If it's Win11, you will see two virtual network adapters; you can use any one of the IPs. - Additionally, you can open the
Device Manageron your computer (searchDevice Managerin the search bar). If the RNDIS and NCM drivers are correctly installed, either one that works is fine:
- Open Task Manager -> Performance, and you will see a virtual Ethernet connection with an IP, for example,
- Linux: No extra setup is required. Just plug in the USB cable. Use
ifconfigorip addrto seeusb0andusb1network adapters, and you can use either IP. Note that the IP, for example,10.131.167.100, is the computer's IP, and the device's IP is the same except the last digit changed to1, i.e.,10.131.167.1. - MacOS: Check the
usbnetwork adapter inSystem Settings->Network. Note that the IP, for example,10.131.167.100, is the computer's IP, and the device's IP is the same except the last digit changed to1, i.e.,10.131.167.1.
- Method 2: Wireless connection. The device connects to the same router or WiFi hotspot that the computer is connected to (if you experience screen lag or high latency with WiFi, use a wired connection). There are two methods for connecting to a wireless hotspot:
- Modify the
wifi.ssidandwifi.passfiles in the TF card's boot partition and reboot to connect. Modification methods:- If you are familiar with SSH, you can connect to the device via SSH (if wired connection is available) and modify the files in the
/bootdirectory. - You can also enter upgrade mode as described in the previous section, after which a USB drive will appear on the computer. Modify the files in it, ensuring to safely eject the drive before rebooting.
- You can also use a card reader, and a USB drive will appear on the computer. Modify the
wifi.ssidandwifi.passfiles in it, ensuring to safely eject the drive before rebooting.
- If you are familiar with SSH, you can connect to the device via SSH (if wired connection is available) and modify the files in the
- If the wired connection is already available, you can follow the next step and use MaixVision to run code. Modify the
tools/wifi_connect.pyscript with your SSID and PASSWORD, then run it.
- Modify the
Preparing the Development Environment
- First, ensure that the computer and device are on the same local area network.
- Download and install MaixVision.
- Use a Type-C cable to connect the device and computer, open MaixVision, and click the
Connectbutton at the bottom left. The software will automatically search for the device. Wait a moment until the device appears, then click the device to connect.
If the device is not detected, you can find solutions in the FAQ.
Here is a video tutorial on using MaixVision:
Connecting to the Internet
The first run requires a network connection to activate the device and install the runtime library. If you do not have a router, you can use your phone to create a hotspot.
In MaixVision, modify the tools/wifi_connect.py script with your SSID and PASSWORD, then run it. For other WiFi connection methods, see the previous section.
Upgrading the Runtime Library
This step is very important!!! If this step is not completed, other applications and features may not function properly (e.g., crashing).
- First, ensure that the WiFi connection from the previous step is completed and that you have an IP address with internet access.
- Run the
tools/install_runtime.pyscript from the MaixVision examples to install the latest runtime library.
If Request failed or a similar error appears, please check if the network is connected and able to access the internet. If the problem persists, take a photo and contact customer service for assistance.
Running Examples
Click on the Example Code on the left side of MaixVision, select an example, and click the Run button at the bottom left to send the code to the device for execution.
For example:
hello_maix.py, click theRunbutton, and you will see messages printed by the device in the MaixVision terminal, and an image will appear in the top right corner.camera_display.py, this example opens the camera and displays the camera feed on the screen.
from maix import camera, display, app

disp = display.Display()          # Create a display object and initialize the screen
cam = camera.Camera(640, 480)     # Create a camera object, manually setting the resolution to 640x480, and initialize the camera
while not app.need_exit():        # Keep looping until the program exits (can exit by pressing the device's function button or clicking the stop button in MaixVision)
    img = cam.read()              # Read the camera feed into the img variable, print(img) can be used to print img details
    disp.show

(img)                # Display img on the screen
yolov5.pydetects objects in the camera feed, draws bounding boxes around them, and displays them on the screen. It supports detecting 80 different objects. For more details, see YOLOv5 Object Detection.
You can try other examples on your own.
If you experience image lag when using the camera examples, it may be due to poor network connection, low-quality USB cable, or poor USB port quality on the host. Try changing the connection method or using a different cable, USB port, or computer.
Installing Applications on the Device
The above steps allow you to run code on the device. Once MaixVision is disconnected, the code will stop running. If you want the code to appear in the boot menu, you can package it as an application and install it on the device.
Click the install application button at the bottom left of MaixVision, fill in the application information, and it will be installed on the device. You will then see the application on the device.
You can also choose to package the application and share it on the MaixHub App Store.
The default examples do not include an explicit exit function. Press the device's function button to exit the application (for MaixCAM, it is the user button).
If you want the program to start automatically at boot, you can modify and run the tools/set_autostart.py script.