中文
中文MaixCAM MaixPy 基于手部关键点检测结果进行进行手势分类
简介
由MaixCAM MaixPy 基于手部关键点检测结果进行进行手势分类可分类手势。
通过前置 AI 模型估计手部关键点获取特征,再由 LinearSVC (支持向量机线性分类算法) 提供了自训练分类各种手势的能力。详情位于 MaixPy/projects/app_hand_gesture_classifier/LinearSVC.py,使用案例见 app 实现,其位于 MaixPy/projects/app_hand_gesture_classifier/main.py。
用户可自行添加其他任意可区分手势进行训练。
使用
预处理
以下是对 AI 模型估计手部关键点 的原始输出 hand_landmarks 数据结构进行预处理得到待使用特征:
def preprocess(hand_landmarks, is_left=False, boundary=(1,1,1)):
    hand_landmarks = np.array(hand_landmarks).reshape((21, -1))
    vector = hand_landmarks[:,:2]
    vector = vector[1:] - vector[0]
    vector = vector.astype('float64') / boundary[:vector.shape[1]]
    if not is_left: # mirror
        vector[:,0] *= -1
    return vector
导入模块
也可直接前往该目录 target_dir 拷贝 LinearSVC.py 实现
# 为了导入 LinearSVC
target_dir = '/maixapp/apps/hand_gesture_classifier/'
import sys
if target_dir not in sys.path:
    sys.path.insert(0, target_dir)

from LinearSVC import LinearSVC, LinearSVCManager
分类器(LinearSVC)
介绍分类器(LinearSVC)的各项功能和使用方法。
初始化,加载和导出
# 初始化
clf = LinearSVC(C=1.0, learning_rate=0.01, max_iter=500)
# 加载
clf = LinearSVC.load("/maixapp/apps/hand_gesture_classifier/clf_dump.npz")
# 导出
clf.save("my_clf_dump.npz")
初始化方法参数
C=1.0(正则化参数)
- 控制支持向量机(SVM)的正则化强度。
- C 值越大,对误分类的惩罚越高,模型会尝试严格分类每个样本,可能会导致过拟合。
- C 值越小,允许一定程度的误分类,提高泛化能力,可能会导致欠拟合。
默认值:1.0,适中的正则化,平衡准确性和泛化能力。
learning_rate=0.01(学习率)
- 控制权重更新的步长大小,即每次梯度下降优化时,参数调整的速度。
- 学习率过大,可能会导致优化过程无法收敛,甚至发散。
- 学习率过小,优化过程收敛速度过慢,训练时间较长。
默认值:0.01,通常为适中的学习率,确保模型逐步逼近最优解。
max_iter=500(最大迭代次数)
- 控制训练过程中执行的最大优化轮数。
- 迭代次数越多,模型有更多机会找到最优解,但过多的迭代可能会导致训练时间过长或过拟合。
- 如果 max_iter 过小,可能在尚未收敛时就提前停止,导致欠拟合。
默认值:1000,允许模型有足够的训练轮次来收敛。
加载和导出方法参数
- filename: str
- 目标文件路径,支持相对和绝对路径
- 必须提供
训练和预测(分类)
分类器初始化后需要进行有效训练才能完成后续分类任务。
若是直接加载先前的训练器备份,即可直接用于分类。
每次训练都是全量训练,即会丢失先前训练结果。建议:有需要请及时导出当前分类器备份。
npzfile = np.load("/maixapp/apps/hand_gesture_classifier/trainSets.npz") # 预加载特征和ID(name_classes 索引)
X_train = npzfile["X"] # 原始特征
y_train = npzfile["y"] # 标签id
clf.fit(clf.scaler.fit_transform(X_train), y_train) # 标准化特征后训练SVM
# 回归
y_pred = clf.predict(clf.scaler.transform(X_train)) # 标准化特征后预测类别
recall_count = len(y_train)
right_count = np.sum(y_pred == y_train)
print(f"right/recall= {right_count}/{recall_count}, acc: {right_count/recall_count}")
# 预测
X_test = X_train[:5]
feature_test = clf.scaler.transform(X_test) # 标准化特征
# y_pred = clf.predict(feature_test) # 预测类别
y_pred, y_conf = clf.predict_with_confidence(feature_test) # 预测类别
print(f"pred: {y_pred}, conf: {y_conf}")
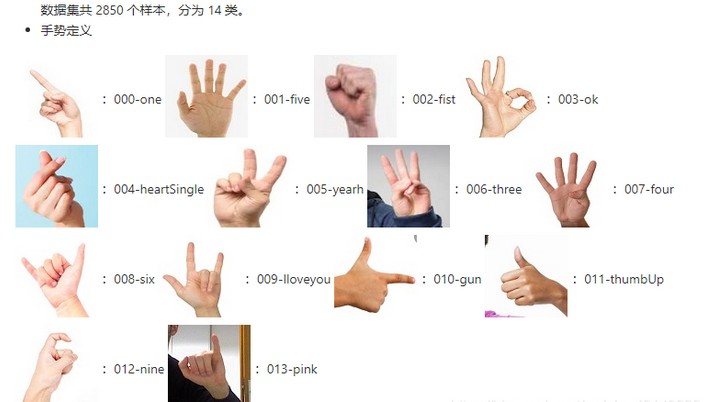
# 对应的类别名 name_classes = ("one", "five", "fist", "ok", "heartSingle", "yearh", "three", "four", "six", "Iloveyou", "gun", "thumbUp", "nine", "pink")
由于每次都是是全量训练,直接使用分类器时,还需要手动维护先前训练的特征和对应标签的存储,才能实现动态增删改分类类别。
为了简化使用并降低额外负担,现封装了 分类器管理器(LinearSVCManager),见下节。
分类器管理器(LinearSVCManager)
介绍分类器管理器(LinearSVCManager)的各项功能和使用方法。
初始化,加载和导出
无论 初始化 或 加载 都必须提供有效 X,Y(对应特征和标签)输入。
且保证长度相等,元素一一对应,否则会报错。
# 初始化,加载
def __init__(self, clf: LinearSVC=LinearSVC(), X=None, Y=None, pretrained=False)

# 使用默认参数的 LinearSVC 进行初始化
clfm = LinearSVCManager(X=X_train, Y=y_train)
# 使用特定参数的 LinearSVC 进行初始化
clfm = LinearSVCManager(LinearSVC(C=1.0, learning_rate=0.01, max_iter=100), X_train, y_train)

# 加载必须使用加载的 LinearSVC 并且指定 pretrained=True 避免无意义的当场二次训练
# 且需要保证 X_train, y_train 确实是先前用来训练 LinearSVC 的
clfm = LinearSVCManager(LinearSVC.load("/maixapp/apps/hand_gesture_classifier/clf_dump.npz"), X_train, y_train, pretrained=True)

# 导出参数请使用 LinearSVC (clfm.clf) 的 save
clfm.clf.save("my_clf_dump.npz")
# 导出用于训练的特征和标签
np.savez("trainSets.npz",
            X = X_train,
            y = y_train,
        )
访问已用于训练的数据
clfm.samples 为一个 python 二元组:
- clfm.samples[0] 为
X - clfm.samples[1] 为
Y
请不要直接修改,仅供只读访问。否则需手动调用 clfm.train() 重新训练。
添加或移除
添加请确保 X_new 和 y_new 长度相等,且形状对应先前的 X_train 和 y_train。
皆为 numpy 数组,可自行通过 shape 字段确认。
# 添加
clfm.add(X_new, y_new)

# 移除
mask_ge_4 = clfm.samples[1] >= 4  # 大于等于 4 的掩码
indices_ge_4 = np.where(mask_ge_4)[0]
clfm.rm(indices_ge_4)
以上操作主要处理 clfm.samples,但每次会在结尾调用 clfm.train() 再训练。
因此,根据待训练数据规模,等待些许时间后,便可直接应用。
预测
y_pred, y_conf = clfm.test(X_test) # 预测类别
等价于
clf = clfm.clf
feature_test = clf.scaler.transform(X_test) # 标准化特征
y_pred, y_conf = clf.predict_with_confidence(feature_test)  # 预测类别
示例(效果视频简化版本)
注意:
- 缺失 preprocess 实现,请从
预处理拷贝过来 - 缺失 LinearSVC 模块,请从
导入模块拷贝过来
分类预测部分如下,可单文件运行:
from maix import camera, display, image, nn, app
import numpy as np

# 添加在我下面

name_classes = ("one", "five", "fist", "ok", "heartSingle", "yearh", "three", "four", "six", "Iloveyou", "gun", "thumbUp", "nine", "pink") # , "class N", "class N+1", ...) # 易于理解的标签名
npzfile = np.load("/maixapp/apps/hand_gesture_classifier/trainSets.npz") # 预加载特征和ID(name_classes 索引)
X_train = npzfile["X"]
y_train = npzfile["y"]
clfm = LinearSVCManager(LinearSVC.load("/maixapp/apps/hand_gesture_classifier/clf_dump.npz"), X_train, y_train, pretrained=True) # 使用预加载分类器初始化 LinearSVCManager

detector = nn.HandLandmarks(model="/root/models/hand_landmarks.mud")
cam = camera.Camera(320, 224, detector.input_format())
disp = display.Display()

# Loading screen
img = cam.read()
img.draw_string(100, 112, "Loading...\nwait up to 10s", color = image.COLOR_GREEN)
disp.show(img)

while not app.need_exit():
    img = cam.read()
    objs = detector.detect(img, conf_th = 0.7, iou_th = 0.45, conf_th2 = 0.8)
    for obj in objs:
        hand_landmarks = preprocess(obj.points[8:8+21*3], obj.class_id == 0, (img.width(), img.height(), 1)) # 预处理
        features = np.array([hand_landmarks.flatten()])
        class_idx, pred_conf = clfm.test(features)  # 获取预测类别
        class_idx, pred_conf = class_idx[0], pred_conf[0] # 复数输入,复数返回,取第一单元
        msg = f'{detector.labels[obj.class_id]}: {obj.score:.2f}\n{name_classes[class_idx]}({class_idx})={pred_conf*100:.2f}%'
        img.draw_string(obj.points[0], obj.points[1], msg, color = image.COLOR_RED if obj.class_id == 0 else image.COLOR_GREEN, scale = 1.4, thickness = 2)
        detector.draw_hand(img, obj.class_id, obj.points, 4, 10, box=True)
    disp.show(img)
目前使用的 X_train 基于的原始数据集为14 类静态手势数据集,数据集下载地址(百度网盘 Password: 6urr ),其中数据集共 2850 个样本,分为 14 类。
效果视频
该 app 实现位于 MaixPy/projects/app_hand_gesture_classifier/main.py,主要逻辑是
- 加载
14 类静态手势数据集经手部关键点检测处理后的20个相对手腕的坐标偏移 - 初始训练前
4个分类 或直接加载预训练的14分类器参数(源码可切换),以支持手势识别 - 加载
手部关键点检测模型处理摄像头并通过该分类器将结果可视化在屏幕上 - 点击右上角
class14可增添剩余分类样本再训练以达到14分类手势 - 点击右下角
class4可移除上一步添加的分类样本再训练以达到4分类手势 - 点击按钮之间的小块区域,可在顶部显示分类器上一次训练的时长
- 点击其余大块区域,可在左侧显示当前支持的分类类别,绿色表示支持,黄色表示不支持
- 视频演示内容为执行了上述第
4步 或第2步加粗部分后的14分类模式,可识别手势1-10(默认对应其他英文释义),ok,大拇指点赞,比心(需要手背,拍摄时不好演示,可自行验证),小拇指伸展 一共14种手势。 - 紧接着执行第
5步,回退到4分类模式,仅可识别 1,5,10(握拳)和 ok,其余的手势都无法识别到正常结果。期间也有执行 第7步展示了当前是4分类模式,因为除了前 4 种手势为绿,后 10 种全部为黄色显示。 - 再就是执行第
4步,恢复到14分类模式,4分类模式无法识别的手势现在也恢复正确识别了。 - 末尾展示了双手的识别,实测可同时正确识别两只手的手势。
其它
效果视频为捕获的 maixvision 右上的屏幕预览窗口而来,和屏幕实际显示内容一致。
更详细使用方法或二次开发请参考上述分析阅读源码,内附有注释。
如仍有疑惑或需要协助,可于 maixhub 上发帖留言或发 e-mail 到公司邮箱 support@sipeed.com,标题请使用[help][MaixPy] guesture classification: xxx。